Plan Your Perfect Gallery Wall

Grid, salon-style, row, or freeform — every gallery wall layout works better with polaroid prints. Consistent sizing, white borders, matte finish. Prints from ₹7/print, ₹100 flat shipping.

From ₹7/print·₹100 shipping·Buy what you need

Gallery Wall Layout Ideas with Polaroid Prints

Four ways to display and use your prints — with specific tips on quantities and arrangement.

Classic Grid Layout

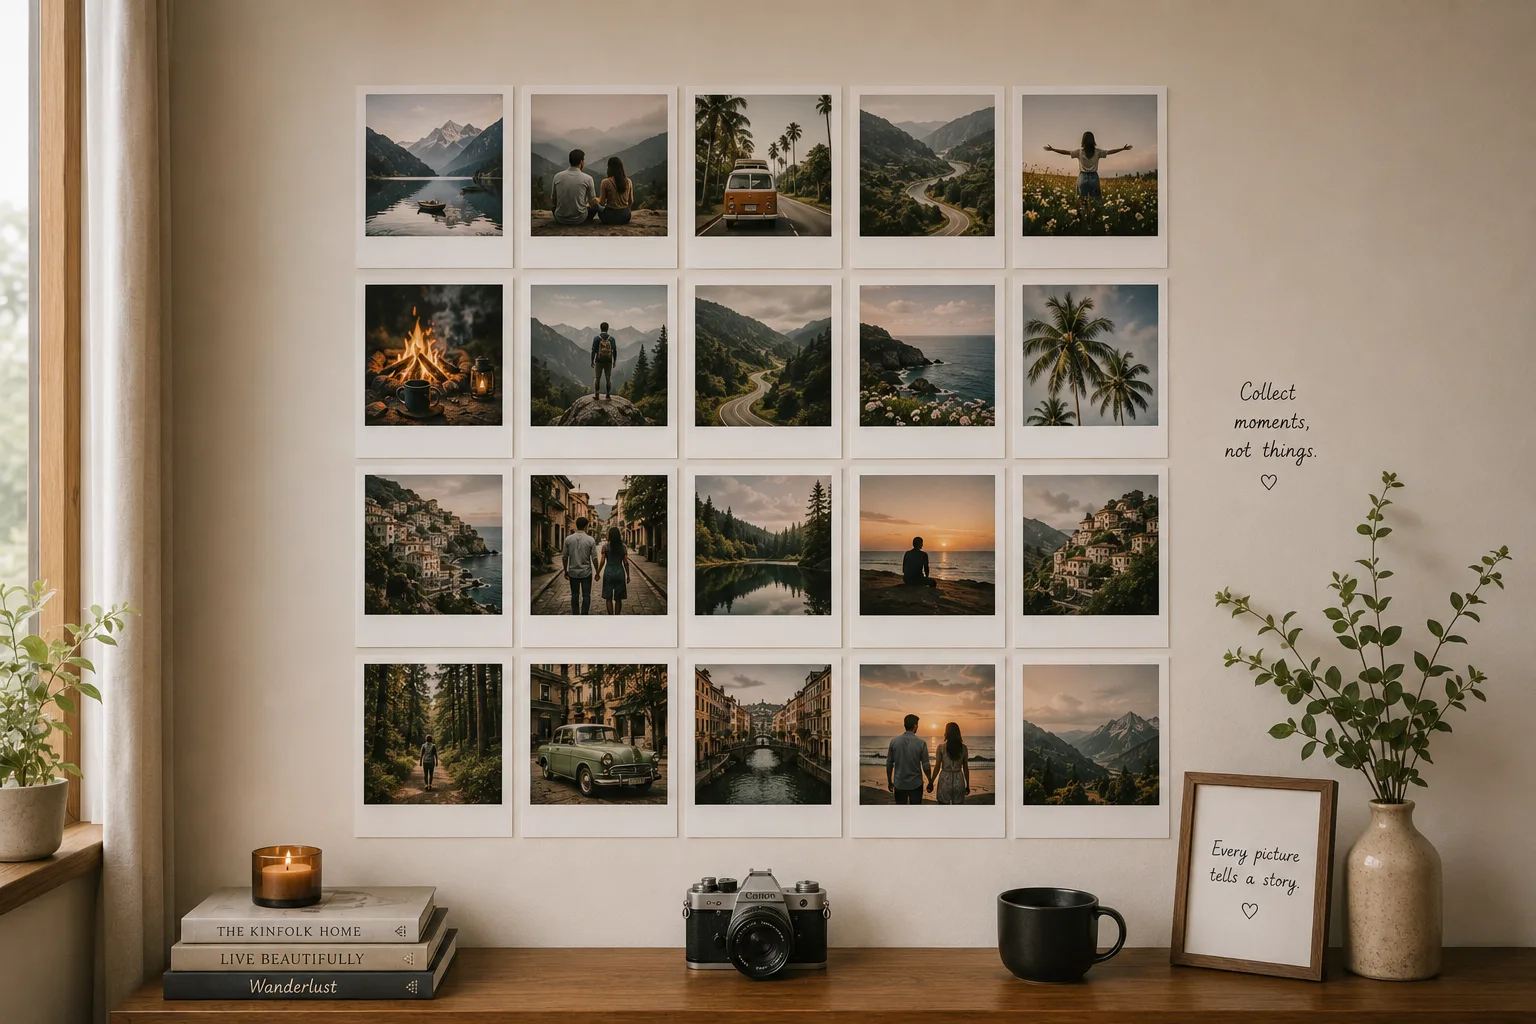
The most reliable gallery wall layout: a perfectly aligned grid of equal-sized prints with consistent spacing. For a 4×5 grid (20 prints), measure your wall space and mark a light pencil grid before placing any prints. Each print should have exactly 8 cm of clear space on all sides. This layout works because consistency creates calm — the eye does not have to work to understand the arrangement. Use only Classic Retro 3×4 prints in a single grid (no mixing sizes) and apply one consistent filter across all 20 prints for maximum visual cohesion. Twenty prints is exactly right for a 4×5 grid with no spares needed.

TIPMark the full grid in pencil on the wall before placing any prints — measure twice, stick once.

Salon-Style Layered Mix

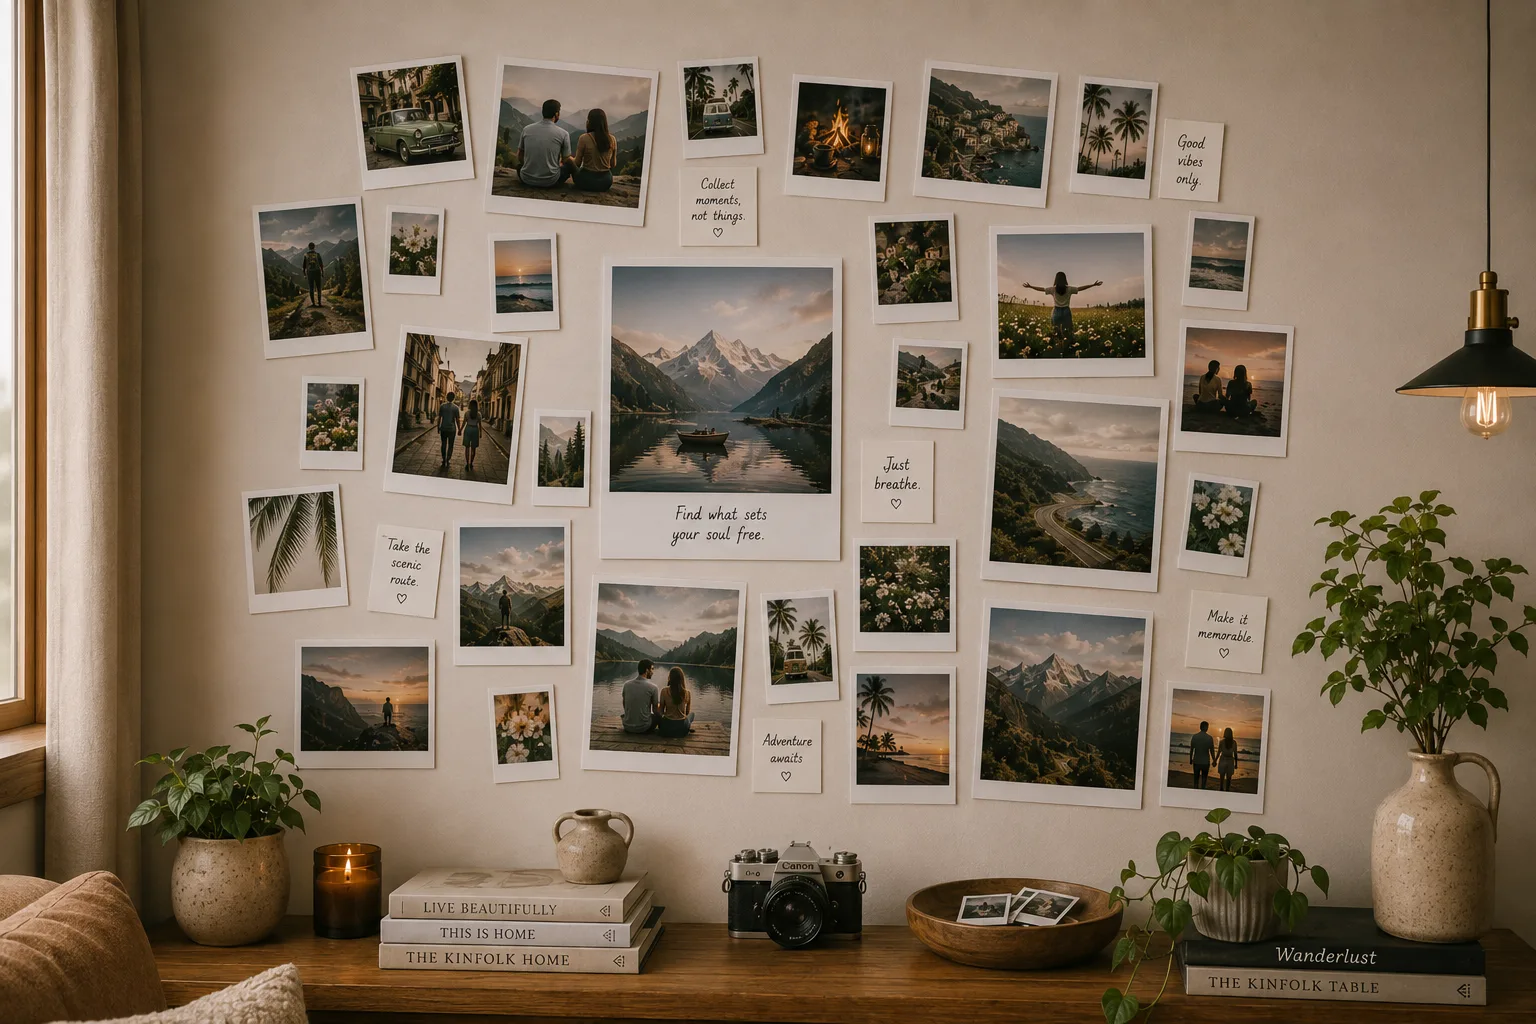
The salon-style gallery wall combines multiple sizes arranged loosely without strict alignment — a few 4×6 prints anchoring the composition, surrounded by 3×4 prints filling the mid-ground, and Mini 2×3 prints tucked into gaps. The key technique is to start from the centre outward: place your largest or most important print at the visual centre first, then build outward. Allow prints to sit at slight angles (5–10 degrees) rather than forcing all to be level. The arranged-but-not-perfect quality is what makes salon-style walls feel full and curated. Plan for 25–35 prints at mixed sizes for a salon wall covering 120cm×100cm of wall space.

TIPStart from the centre outward and allow slight angle variation — forced perfection kills the salon look.

Asymmetric Row Cluster

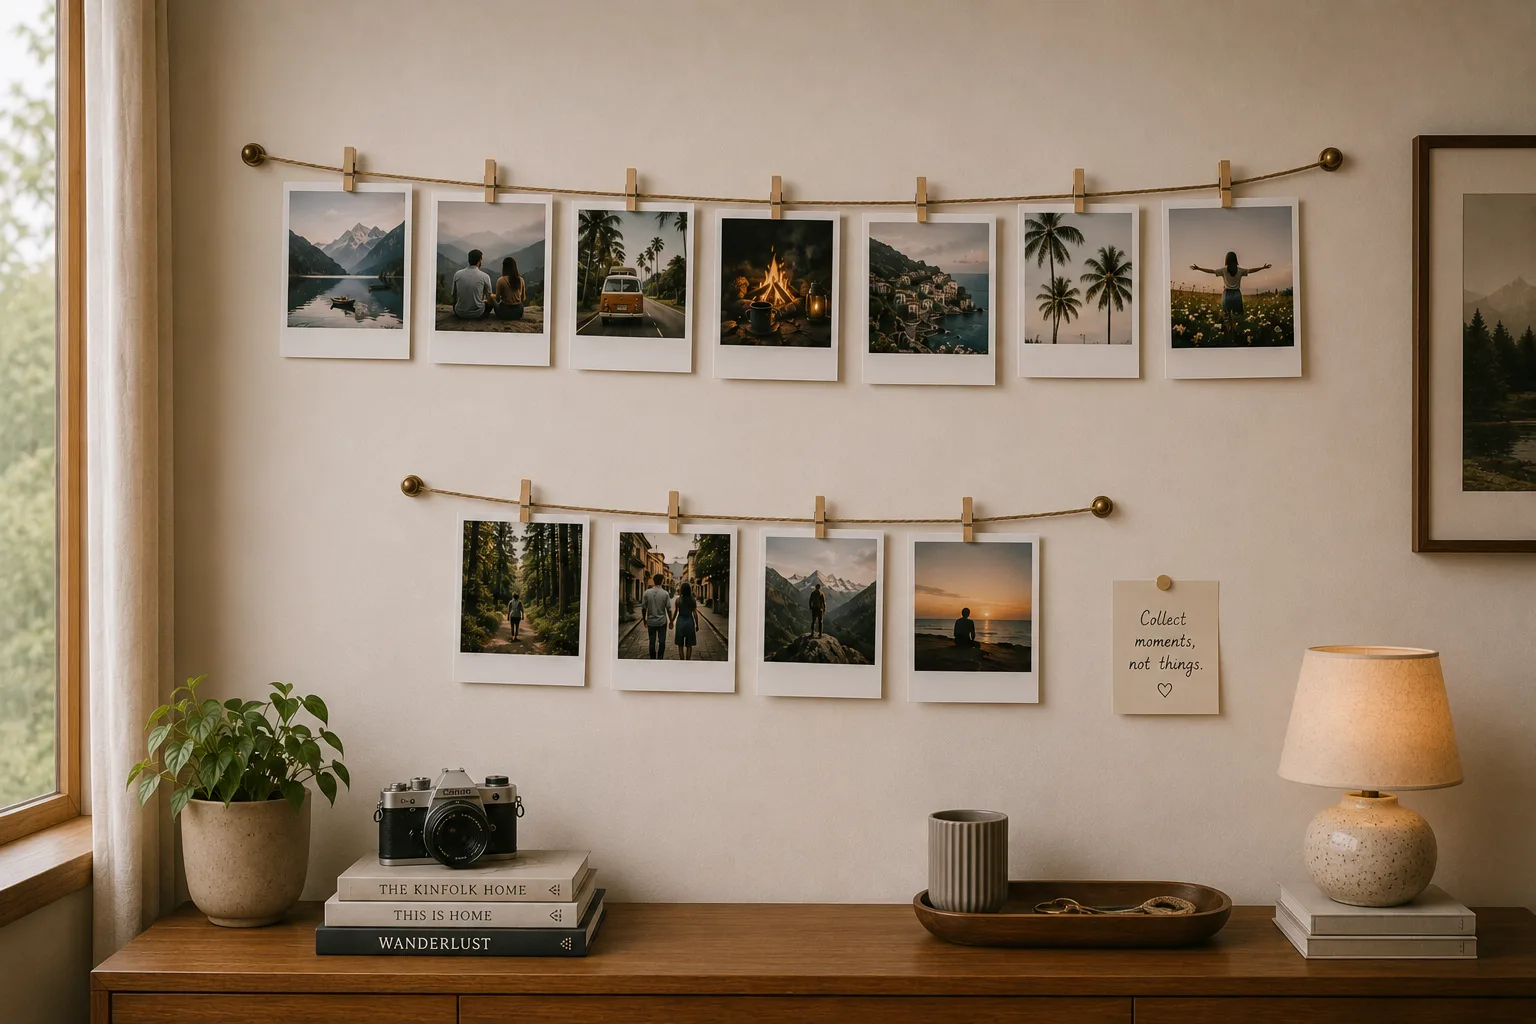
Two horizontal rows of prints, but deliberately unequal: the top row has 7 prints, the bottom row has 4. The bottom row is not centred beneath the top row — it is offset to the left or right. This asymmetry creates visual movement — the eye travels from the larger top row down and across to the smaller bottom cluster. Use the jute rope for each row, mounted at different heights. The total of 11 prints is achievable from a single 20-print order, leaving 9 prints for a secondary display or rotation. This layout is particularly effective in rooms where the wall space is wide but not tall.

TIPOffset the shorter bottom row to one side — perfect centering would flatten the visual energy.

Staircase Diagonal

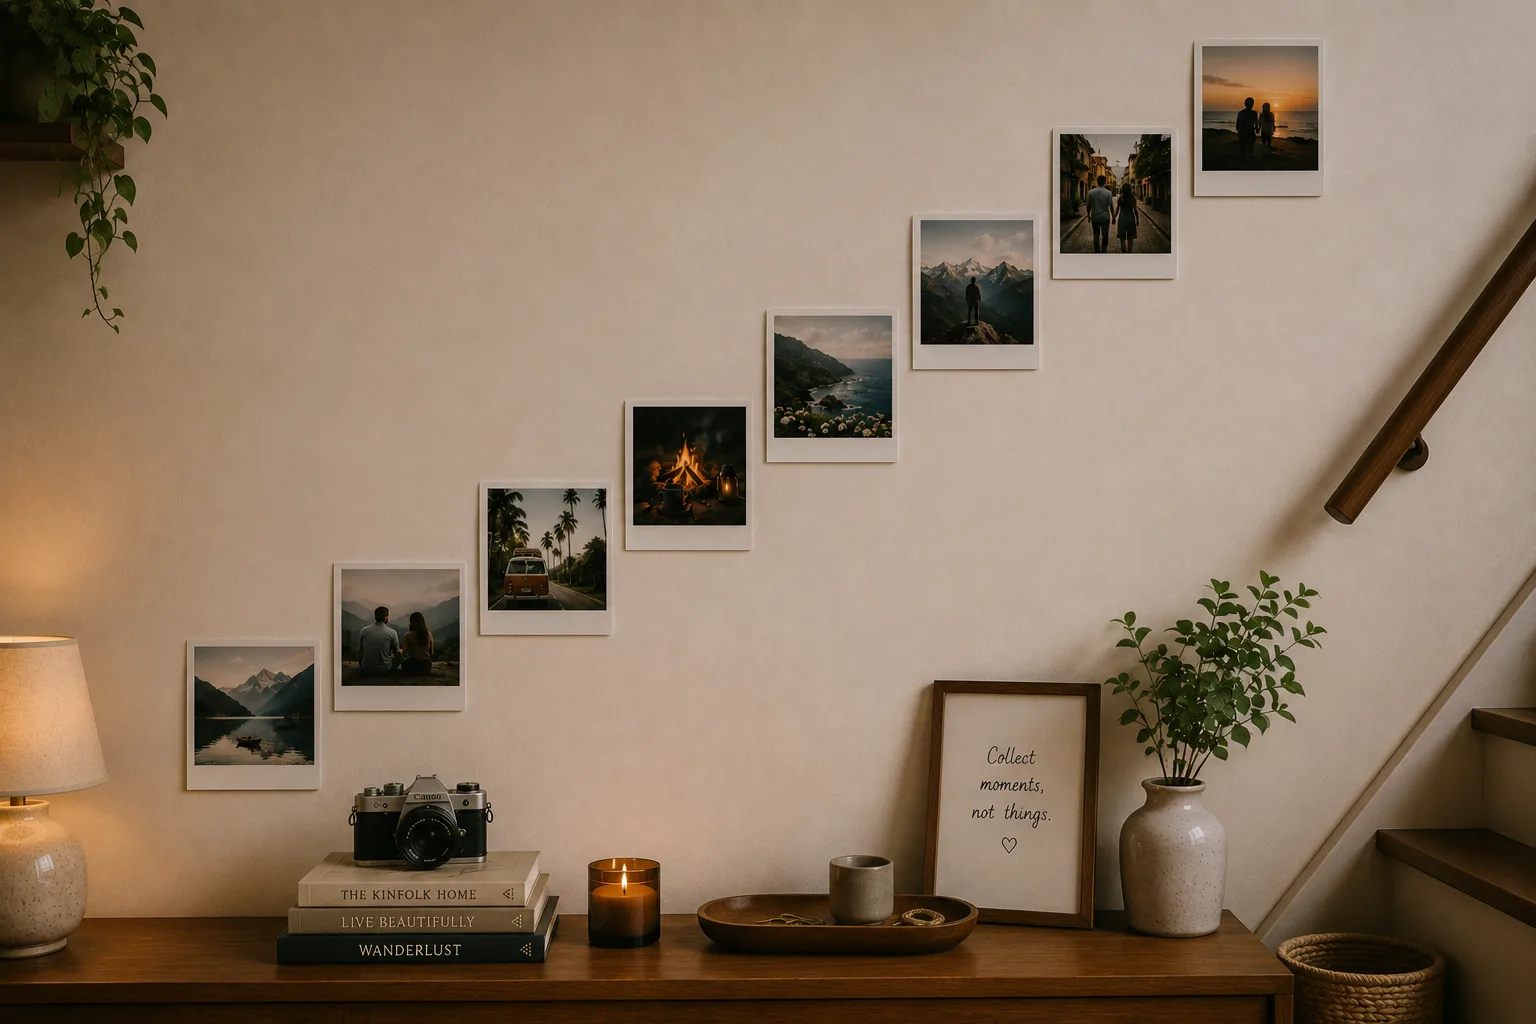
Arrange 8–12 prints in a diagonal line ascending from lower-left to upper-right, following the line of a staircase wall or simply creating a diagonal axis on a flat wall for dynamic effect. Each print is placed slightly higher and to the right of the previous one, with equal spacing on the diagonal axis. This layout creates movement — the eye follows the line naturally. A diagonal print arrangement on a flat wall (not a staircase) is an unexpected choice that reads immediately as considered rather than default. Equally spaced diagonal positioning requires measuring — mark the positions in pencil before mounting.

TIPEqual spacing along the diagonal axis is critical — measure each position before mounting.

What You'll Get

Every PrintPolaroid order — same specs, regardless of size or quantity.

3×4 Polaroid Prints

Classic polaroid proportions on 300 GSM premium matte artboard — thick, stiff, and vibrant. Same weight as a real Instax print.

Free Caption in White Border

Add your own text in the white polaroid border using our free online editor. Date, location, inside joke — up to 60 characters.

Filters & Editing Included

Vivid, Vintage, Noir, Cool, Soft — apply a film-style filter in our browser editor. No app download, no login required.

Secure Packaging

Every order arrives flat — packed between two sheets of 7-ply corrugated cardboard. No bending, no creasing, regardless of transit conditions.

No Minimum Order

Order 1 print or 500 — no bulk requirement, no minimum spend. Same quality and same-day dispatch regardless of quantity.

Pricing

From ₹7/print  ·  Order 1 or 500 — no minimum  ·  ₹100 flat shipping

Order in 3 Steps

  1. Upload your photos

    Go to our free polaroid maker. Upload JPGs or PNGs from your phone or laptop. Crop, add a caption, and apply a filter — takes about 2 minutes per photo.

  2. Customise and order

    Choose Classic (3×4), Mini (2×3), or 4×6 prints. Pick your quantity — prices from ₹7/print. ₹100 flat shipping on all orders.

  3. Receive and display

    Your prints ship the same day (confirmed orders before 1:00 PM). They arrive flat in protective packaging.

Gallery Wall Layout Ideas with Polaroid Prints — Complete Guide

Gallery walls are one of the most transformative things you can do to a room — they shift a plain wall from background to feature, add personality, and create visual warmth. Polaroid prints are particularly suited to gallery walls because the consistent white border acts as a natural frame, removing the need for individual picture frames and giving the entire arrangement visual coherence even when prints are at different angles.

Choosing your layout

Before ordering prints, decide on your layout. The grid is the safest starting point because equal sizing and consistent spacing are forgiving of slight imprecisions. The salon style is the most dynamic but requires planning and a higher print count. The row and cluster formats are good middle grounds — structured enough to look intentional, flexible enough to accommodate slight variations.

Measuring and planning before mounting

The most common gallery wall mistake is mounting without measuring. For any layout beyond a casual scatter, spend 20 minutes with a tape measure, pencil, and spirit level before touching the wall with adhesive. Mark the centre point of your intended display area, then work outward. For a grid, mark each mounting point in pencil and verify the spacing is consistent before placing the first print.

How many prints for common wall sizes

A standard bedroom accent wall (150cm × 100cm): 20–30 prints in a grid or salon arrangement. A hallway or corridor section (80cm × 150cm tall): 12–18 prints in a vertical column or multi-row stack. A narrow bedside section (60cm × 80cm): 6–9 prints in a 3×3 grid or 2×3 rows. A full living room feature wall (200cm × 140cm): 35–50 prints in a salon-style arrangement.

Mixing print sizes in a gallery wall

Size mixing adds visual interest but requires planning. The most stable mixing ratio is: 60% of your dominant size (usually 3×4 Classic), 30% of a complementary size (4×6), and 10% accent size (Mini 2×3). This ratio prevents any one size from dominating or disappearing. Anchor the arrangement with the largest prints at key visual positions — the centre, the corners, or the top row.

Hanging tools for a gallery wall

For a jute rope gallery wall, 2 metres of rope and 10 clips handles approximately one horizontal row of 10 prints. For a multi-row gallery wall, you will need additional rope and clips — both are available inexpensively at any craft store. Plan your print orders in batches that give you enough prints for your intended layout.

Creating visual flow

A good gallery wall has a path for the eye to follow. In a grid, the eye moves left-to-right, row by row. In a salon arrangement, it moves from the largest print outward. In a diagonal, it follows the line. Identify the intended flow direction of your layout and check that no single print is so visually loud that it breaks the flow — the prints should pull the eye through the arrangement, not trap it in one spot.
Frequently Asked Questions

More Display Ideas

Ready to Print?

From ₹7/print · Buy what you need · ₹100 flat shipping

Same-day dispatch on orders confirmed before 1:00 PM